What a great way to spend a relaxing weekend with family and friends, grilling outside, dining or chatting over a cup of coffee. But the prerequisite for enjoyment is that you have a fun, comfortable space outdoors, so come build an outdoor decking. A deck is also a fixture that can add a lot of value.
You may be thinking that building a deck is difficult, so you can break it down into smaller sub-projects,so that building a basic deck will be much easier. Taking your time through the process and knowing what you're doing will help you build the deck .
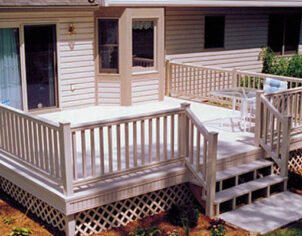
A basic rectangular deck is attached to the side of the house. To ensure a strong connection, one side of the deck is attached to the structural members of the house with ledger board.
2. The other side of the deck is supported by a beam. The beam is parallel to the house and rests on vertical posts. These columns are supported by concrete bases that are sunk into the ground.
3. The ledger board forms one side of the outer frame of the deck on all four sides. The other three sides are composed of a top joist parallel to the house and two outer edge joists perpendicular to the house.
4. Inside the frame are floor joists perpendicular to the house.
5. The floor is attached to the top of the joists.
6. A railing is installed to provide security for the deck.
Regulations and Permits
In most areas you will need to apply for a building permit from your local government before you can proceed with building renovations. And one of the benefits of building a decking or floating deck is that staying below a certain height (usually 30 inches) often does not need a permit.
This project has a deck attached to the house, a situation that would normally require a permit. Also, because decks can be built higher, railings and handrails are required.
When to Build a Deck
Early fall is a prime time to build a deck or floating deck. After fall, the temperature drops and this is the right time to do some outdoor work. But building a deck in the fall can also be stressful and needs to be completed before winter sets in. If you decide to do it yourself, you may also choose to start in late spring. Then you will have a longer work days and warmer weather.
Before building the deck
The location for building the deck should be flat and free of other obstructions. The deck can be accessed from the back or side door of the house. Do not place the deck flush with the height of the house floor. Instead, the deck should be lowered at least 3 inches.
Cost of building a deck
Cost is one of the biggest concerns. Building a small attached deck will cost $2,000 to $5,000, depending on the size of the deck and the materials used.
Types of decking materials
Pressure-treated wood: This wood is inexpensive, available and using as decking on most decks. The disadvantage is that it produces splinters and is so not suitable for barefoot walking. Over time, this type of wood decking can also crack and warp.
Wood Plastic Composite Decking: Made from recyclable plastic as well as wood fibers, it does not need staining or coating. It will not crack, rot, warp or splinter. And it requires little to no maintenance, reducing significant time and labor costs.
Cedar: About twice the price of pressure-treated wood, cedar is usually resistant to insects and is easy to stain. The downside is that it also has a tendency to crack and warp.
Tropical hardwoods: Tropical imported hardwoods such as ipe, represent the high-end decking material. Their hardness and density mean that they do not absorb stains well and need oil to protect them. Tropical hardwoods must be fastened to the joists with special hidden clips.
Safety Considerations
Follow the safety recommendations that come with all power tools used. Height can be a safety issue when building an elevated deck; even a foot or two can be enough to cause injury.
Installation instructions
1.Size and Cut Ledger
01.Use the bubble level and pencil to outline the shape of the ledger on the siding.
02.Set the circular saw to siding depth and cut on the outline.
03.With the hammer and chisel, cut away areas of the siding that the saw blade could not reach.
04.Remove cut siding and dispose of it.
05.Measure out the pressure-treated two-by-eight to the size of the cutout.
06.Cut the two-by-eight.
2. Fix the ledge on the house
01.Cut the galvanized metal flashing to the length of the ledge.
02.Install the flashing on the top of the opening, underneath the siding.
03.Secure the ledge to the ledge opening with nails. Do not put nails in the studs of the house, as you will need to leave these for lag screws.
04. Use a cordless drill to drill pilot holes for the lag screws, plus counterbores (to allow the heads of the lag screws to sink). Do this for every other stud, two holes per stud.
05. Using a ratchet set, drive the lag screws and washers into the studs.
06. Using a caulking gun and exterior grade caulk, caulk around the ledge, including the lag screw holes and flashing.
3. Determine the location of the column footings
01. Measure 8 feet outward from the ledge to determine the approximate location of the three column footings.
02. Make five pads from scrap two-by-four boards.
03. Stake the boards outside the expected dimensions of the deck: three at the ends and one on each side.
04. Draw a mason's line between the punched boards on each side, above the expected location of the post footings.
05. Three mason lines from the sill to each of the three end striking boards. These lines should be above the expected footing locations.
06. Drop the lead hammer to the ground at the three intersections formed by the masonry lines.
07. Mark the location on the ground where the lead hammer will touch. Leave the lines and footings in place for now.
4. Digging and pouring foundation
01. Dig three foundation holes at the lead hammer marks. Dig below the frost line or as specified by the regulations in your area.
02.Add 3 inches of loose gravel to the bottom of each hole.
03. Use a hand saw to cut the concrete pipe to the depth of the footing hole, adding an additional 2 inches. Insert each pipe into the footing hole.
04. Mix the concrete with a garden hoe on a wheelbarrow.
05. Fill the concrete tubes with concrete to the top.
06.While the concrete is still wet and pliable, insert the J-bolts into each pipe with the threaded side facing up, exposing approximately 1 inch. Use a lead hammer to determine the position of each J-bolt.
07.Remove the base plate and threads.
5. Install the pillar
01.Place a metal post anchor on each J-bolt on the base.
02.Place a nut on each threaded J-bolt and fasten it.
03.Cut three six by six posts with a chainsaw. The length of each post should be the distance between the top of the concrete base and the bottom of the wood beam, and an additional 1 foot.
04. Nail the posts to the anchors of the metal posts.
05. Plumb the posts. Use scrap two-by-fours to hold each post in place.
06.Add cut points to the posts. Do this by using a two-by-four as a mock joist to span from the ledge to each post. Start in a horizontal position and then drop the far end to allow for a 1/4 inch drop every 5 feet. This slope will allow water to flow away from the house.
07. Mark the cutting point on each post, using the bottom of the two-by-four as a reference point. Use a quick square to wrap the marker around the post, but do not cut it yet.
6. Installing the beams
01. If you are not using laminated outdoor grade beams, you can make your own by sandwiching two two-by-eights together with construction adhesive and nailing them in place.
02. Lift the beam onto the post and mark the post on the beam.
03. Use a circular saw to cut the posts on the markings you made earlier.
04. Install the saddle hardware at the top of each post. Make sure the open saddles are all in the same direction to accept the beams.
05. Insert the beams and secure them to the saddle hardware with galvanized screws.
7. Constructing the top plate and outer joists
01. Connect the two outer joists. Each joist will be placed on one end of the ledge. Use joist hangers to secure them to the ledge.
02. Attach the two outside joists in place so that they span from the sill to the beam and extend to the outside of the beam.
03. Attach the top joist to the two outside joists. This is done by using a face nail through the header joist and nailing it to the outside joist.
04. The outer frame of the top joist and outer joist should be checked for flatness. Measure each diagonal; if the frame is square, the two numbers will line up. Make adjustments as needed.
8. Hang the floor joists
01. Use a tape measure to mark every 16 inches along the length of the sill (or as specified on your deck plan). Start with one joist on the outside and use it as the first joist.
02. Repeat the same measurement process on the top joist of the deck.
03. Nail joist hangers to the center at each mark.
04.Cut the floor joists two by two to the specified lengths using a chainsaw.
05. Install the joists into the joist hangers.
06.Nail the joists into the joist hangers.
9. Laying the decorative boards
01. Dry fit the deck flooring over the deck framing to get an idea of how many pieces are needed to accommodate the distance from the house to the top joists. The last piece of flooring should be flush with the edge of the top joist. Leave a 1/8" gap between the floor boards.
02. Starting at the house, secure the flooring to the deck joists with flooring screws.
03. On the last five to six floors, you may need to change the flooring seam slightly so that the last floor is flush with the joists. This is a much better width than ripping the last piece of flooring out.
04. Use a circular saw to cut off the ends of the floor boards so that they are flush with the outer edge joists.
10. Install the stairs
01.Cut the notched stair crossbeam to the desired length.
02. Use the mitered brackets to install the stringers in the desired location on the side of the deck. A common stair width is 36 inches.
03. Cut two by six so that there are two of each stair tread (step).
04. Secure the treads to the stringers with deck screws. Space the two boards on each tread 1/8 to 1/4 inch apart.
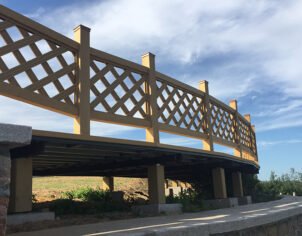
11. Construction of railings
The amount of railing material to order depends on the size of the deck. Calculate that each 6-foot section of deck railing has two 36-inch four-by-four posts, one 6-foot two-by-four post for the top rail, one 6-foot two-by-six post for the railing cap, and 18 36-inch two-by-two posts for the balusters.
01. For the posts of the railing, cut the four-by-four posts to a minimum of 43 1/4 inches. This spans the width of the two-by-eight (7 1/4 inches), plus the minimum height of 36 inches required by code for the deck railing.
02. Drill two holes in each four-by-four panel with a drill bit to a depth of 1/2 inch to allow the lag bolts to be countersunk into the posts.
03. Attach the railing posts to the side of the deck with antler bolts, lock washers and nuts. Or, if the deck is near the ground, you can use lag bolts to avoid tightening the nuts under the deck.
04. Use two-by-four material through the top surface of the post.
05. Lay a two-by-six along the very top of the post to act as a cover.
06.Install two-by-two railings 4 inches apart between the posts.
To ensure that your deck railing meets code, follow these guidelines.
The railing must be at least 36 inches higher than the top of the deck floor.
The distance between posts cannot exceed 6 feet.
Vertical railings between posts should be no more than 4 inches apart - from side to side, not from center to side.
When to call a professional
Building your deck yourself can save on labor costs. If it's a single-level, square or rectangular deck, it's easier to build it yourself. If you want other shaped, multi-level decks, it's best to hire a professional.